|
<< Click to Display Table of Contents >> Editing the Pitch Bend of Notes |
  
|
|
<< Click to Display Table of Contents >> Editing the Pitch Bend of Notes |
|
The pitch of a note can be continuously raised or lowered as it plays by degrees much smaller than normal scale half-steps. This is called pitch bend. The most common example of pitch bend is with electric guitars, where the guitarist stretches the string by pushing against it sideways with the fretting fingers. The stretching of the string raises the pitch. The same musical result of pitch bend can be accomplished with a variety of acoustical instruments, such as other string instruments, saxophones, harmonicas, and clarinets. Pitch bend is also quite often used with electronic keyboards.
If your music keyboard has a pitch bend wheel, Composer will record any pitch bends that you perform and will play them back.
You can also "punch in" pitch bends. That is, you can first record notes, and then in a second recording pass, record pitch bends on top of the previously recorded notes.
You can enter pitch bends using graphical editing tools. With just a little practice you will find that you can draw pitch bend curves that sound as though they were performed live.
Or, if you have captured a live pitch bend and wish to apply it to other notes, you can copy and paste the pitch bend on top of the other notes.
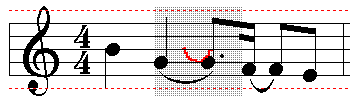
In the following example, a pitch bend starts as the G above middle-C. At the lowest point in the pitch bend, it reaches about 30% of the maximum allowed pitch bend.
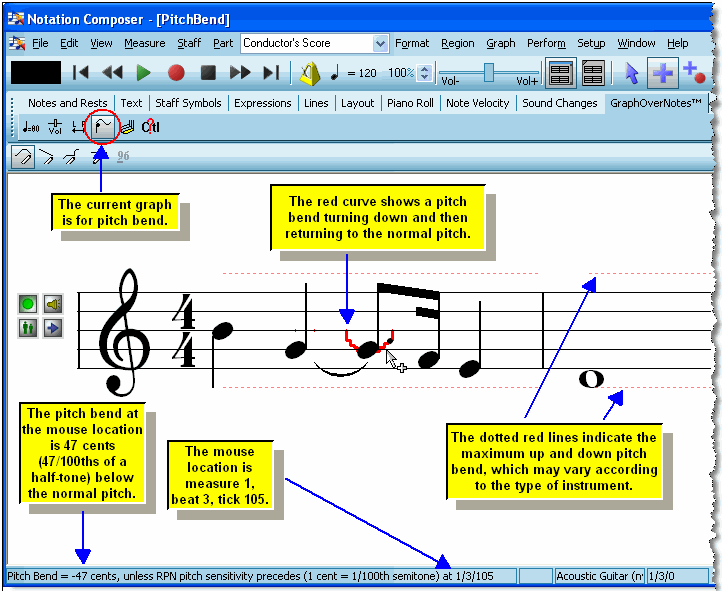
You should be aware that the pitch bend applies to all notes under the graph. If a chord is playing in a given staff, then any pitch bend in that staff applies equally to all of the notes in the chord.
If you have recorded or graphically created a pitch bend, there are a variety of ways in which you can further edit it and copy it to other regions in a staff, as described below.
![]() All of the remaining procedures in this topic for editing pitch bend begin with these two steps:
All of the remaining procedures in this topic for editing pitch bend begin with these two steps:
| 1. | With the mouse, navigate to the GraphOverNotestm Palette. |
-- OR --
Type SHIFT+X.

| 2. | Click the Pitch Bend |
-- OR --
Type "b", "pi" or "pb" for pitch bend.
The following procedure also works for other types of graphical music data that can be recorded from your keyboard or MIDI pedal controllers.
![]() To record pitch bend on top of previously recorded notes, in a second recording pass:
To record pitch bend on top of previously recorded notes, in a second recording pass:
| 1. | Add a new staff, which will be used to record the new pitch bends. It will be most convenient if you add this staff immediately below the staff that has the notes to which the pitch bends will be applied. |
| 2. | If the staff with your notes of interest is assigned to the "Auto" MIDI channel, then assign the staff to a fixed MIDI channel. |
| 3. | Assign the new staff (added in step #1) to the same MIDI channel. |
| 4. | Select the new staff for recording, and start recording. |
| 5. | As you hear the notes played from the previously recorded staff, use the pitch bend control lever on your music keyboard to play the pitch bends. You do not need to play the notes on your keyboard. Only play the pitch bends. |
Because you assigned both the new staff and the previously recorded staff to the same MIDI channel in steps #2 and #3, the pitch bends that you play on the keyboard will be merged in real time with the notes that Composer plays back. That is, you will hear your live performance of the pitch bends applied to the previously recorded notes.
| 6. | Stop the recording. |
If you followed the previous procedure, you will now see the newly recorded pitch bends in the Pitch Bend Graph, as illustrated below:

| 7. | In the newly recorded staff, select a region that has the pitch bends that you want to copy to the first staff with the previously recorded notes. |
| 8. | Type CTRL+C to copy the selected pitch bend graphs to the clipboard. |
| 9. | In the original staff with the notes, select a region for the measures and beats. |
| 10. | Type CTRL+V to paste the pitch bend graphs from the clipboard. |
| 11. | Delete the temporary staff in which the pitch bends were recorded. |
![]() To insert a new pitch bend in a staff:
To insert a new pitch bend in a staff:
| 1. | In the Graph Menu, choose the Draw Curve command. |
-- OR --
In click the Draw Curve ![]() button in the GraphOverNotestm Palette.
button in the GraphOverNotestm Palette.
-- OR --
Type "d" for draw.
| 3. | While holding down the mouse button, drag the mouse to draw the curve of the pitch bend. Then release the mouse button. |
![]() To erase a pitch bend curve:
To erase a pitch bend curve:
| 1. | In the Graph Menu, choose the Erase command. |
-- OR --
Click the Erase ![]() button in the GraphOverNotestm Palette.
button in the GraphOverNotestm Palette.
-- OR --
Type "e" for erase.
| 2. | Move the mouse right before the beginning of the pitch bend curve you want to erase. It does not matter where you place the mouse vertically. It only matters where you place the mouse horizontally, to choose the starting point for erasing. While holding down the mouse button, drag the mouse to the right. |
Composer will remove the graph for the pitch bend as you drag the mouse to the right.
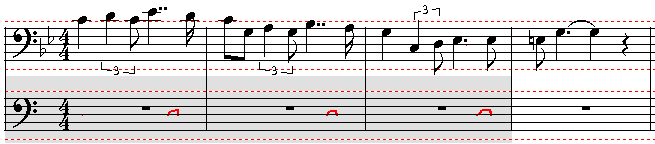
![]() To move a pitch bend forward or backward, or to stretch the duration of a pitch bend so that it extends over a longer or shorter range of beats in the staff:
To move a pitch bend forward or backward, or to stretch the duration of a pitch bend so that it extends over a longer or shorter range of beats in the staff:
| 1. | Select a region in a staff by dragging the mouse while holding down the CTRL key. Pitch bends usually apply to a single note or chord. So drag the mouse from the start of the note to the end of the note, even if the pitch bend does not span the entire note or chord. |
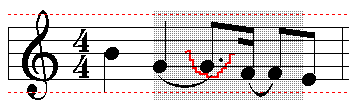
In the example below, a region has been selected in preparation for extending the pitch bend further to the right:
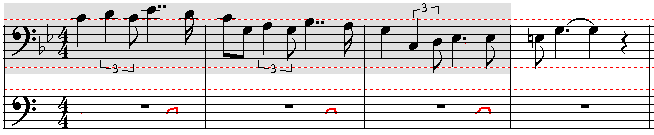
| 2. | Hold down the |
Composer will continuously stretch or move the graph until you release the key.
The following illustration shows the result of stretching to the right the graph in the above example. Because the curve did not start at the beginning of the region, it was necessary to use a combination of stretch commands and shift commands.

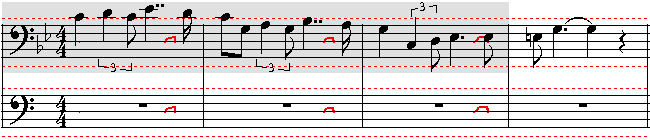
![]() To stretch a pitch bend, so that it changes the pitch by a greater or lesser amount over the same duration:
To stretch a pitch bend, so that it changes the pitch by a greater or lesser amount over the same duration:
| 1. | Select a region in a staff, as in the previous procedure. |
| 2. | Hold down the |
The following illustration continues from the previous example with stretching the pitch bend downward:
![]() To copy a pitch bend from one note, chord, or range of notes to another:
To copy a pitch bend from one note, chord, or range of notes to another:
| 1. | Select the region from which you wish to copy the graph, by holding down the CTRL key and dragging the mouse. Typically the region starts at the beginning of a note or chord that has a pitch bend, and ends at the end of that note or chord. |
| 2. | Choose the Copy Graph From Region command in the Graph Menu. |
-- OR --
Type CTRL+C, which is the standard Windows key combination for Copy to Clipboard.
| 3. | Select the region to which you wish to the copy the graph. |
| 4. | Choose the Paste Saved Graph Into Region command in the Graph Menu. |
-- OR --
Type CTRL+V, which is the standard Windows key combination for Paste from Clipboard.