|
<< Click to Display Table of Contents >> Exporting Your Work in Other File Formats |
  
|
|
<< Click to Display Table of Contents >> Exporting Your Work in Other File Formats |
|
![]() To export your song as a MusicXML file:
To export your song as a MusicXML file:
1.In the File menu, choose Export, then select "MusicXML" and the specific sub-type of MusicXML file you want to export. Composer can export MusicXML as .xml, .musicxml, or .mxl filetypes.
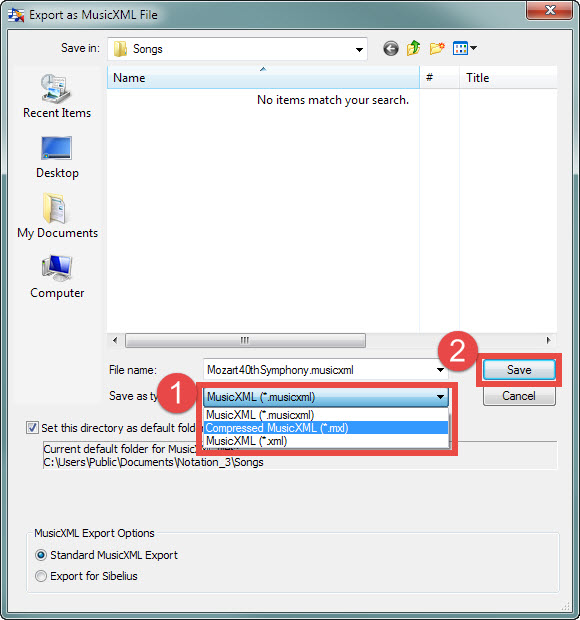
2.The default directory is C:\Users\Public\Documents\Notation_3\Songs. You can change the default directory, if desired, by navigating to another directory and then setting a check mark by "Set directory as default".
3.Select the MusicXML filetype you want to save from the drop list. If the exported score will be used in Sibelius, be sure to check the radio button in the lower left for "Export for Sibelius."
4.Click "Save" to save the MusicXML file. When exporting MusicXML or other export filetypes, be sure to also save your work in a .not filetype for any future editing by using File/Save or File/Save as.
If you have volume changes that you want to save in your MusicXML file, you can insert dynamic markings where the volume changes occur. In these cases, Composer will save the volume at the dynamic mark and it will be saved in the exported MusicXML file.
![]() To export your song as an audio file:
To export your song as an audio file:
1.In the File menu, choose Export, then select "Audio" and the specific type of audio file you want to export. Composer can export .wav, .ogg, .flac, and .mp3 filetypes.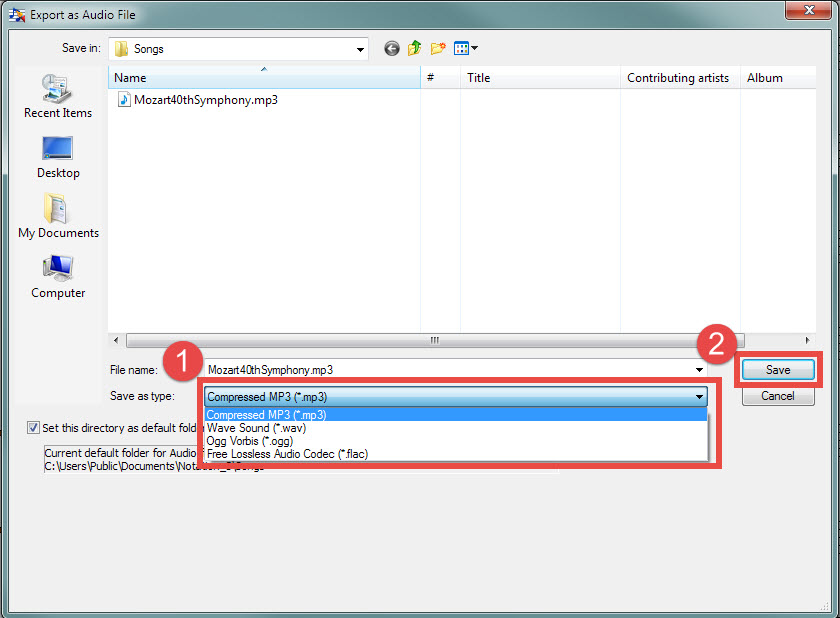
2.The default directory is C:\Users\Public\Documents\Notation_3\Songs. You can change the default directory, if desired, by navigating to another directory and then setting a check mark by "Set directory as default".
3.If after exporting you find that the exported file is either too loud or too low, please see how to adjust the gain for exported audio.
![]() To export your song as a PDF .pdf:
To export your song as a PDF .pdf:
Before exporting a PDF of your song it's a good idea to check each part you want to export in Page View first to make sure that all formatting is the way you want it to look.
Please note that when saving PDF files, each Part is saved in it's own file and will be in the filename format "SongTitle_PartName.pdf" to make it easy for you to keep PDF Parts of the same song together in your folders.
1.In the File menu, choose Export, then select "PDF."The "Save Parts to PDF file" dialog will come up:
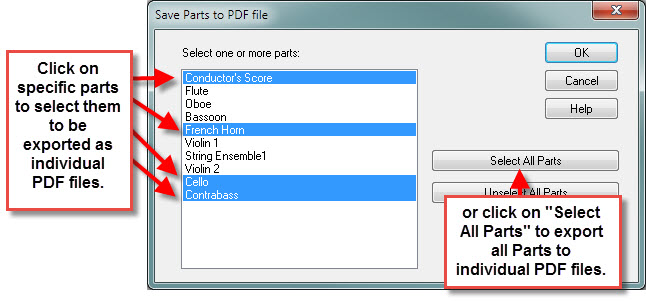
2.After selecting the Parts you wish to export (save) as PDF files, click "Ok."
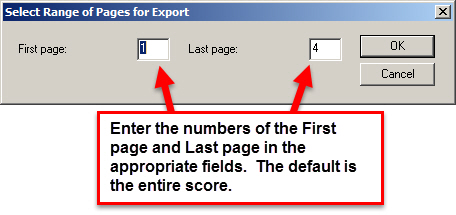
3.You can then select the page range that you wish to export in the PDF then click "Ok.". The default range is the entire score.
4.The Export as PDF File dialog will then come up, where you can navigate to the folder you wish to save the files in. The default directory is C:\Users\Public\Documents\Notation_3\Songs. You can change the default directory, if desired, by navigating to another directory and then setting a check mark by "Set directory as default". Click "Save" to save the PDF files in the selected folder. For each Part a progress window will come up showing you the progress of the export, and will close when the Part is done.
![]() To export your song as an Image (.png, .jpg, .bmp, or .gif) file:
To export your song as an Image (.png, .jpg, .bmp, or .gif) file:
Please note that if you export multiple pages of a Part as an image file, that all those pages will appear in the same image file. If you plan to use the exported image to insert in a document (eg. as a musical "snippet" example), then you probably want to just export the page where your example occurs and then use your favorite editor to crop the image.
To export an image file of your score:
1.In the File menu, choose Export, then select "Image...."The "Save Parts to Image file" dialog will come up:
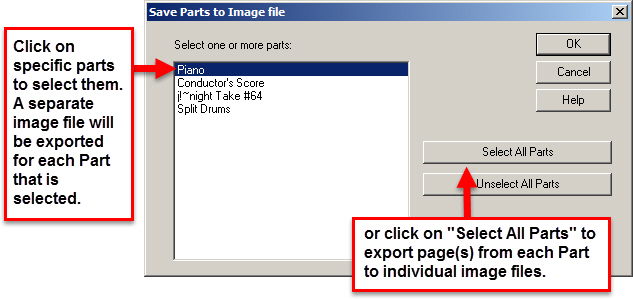
1.After selecting the Part(s) you want to export an image from, click "Ok."
2.You can then select the page range that you wish to export in the image file(s) then click "Ok.". The default range is the entire score.
1.The "Save in:" dialog will then come up, where you can navigate to the folder you wish to save the file in, as well as select the image filetype you want to export. The default directory is C:\Users\Public\Documents\Notation_3\Songs. You can change the default directory, if desired, by navigating to another directory and then setting a check mark by "Set directory as default". Click "Save" to save the image file(s) in the selected folder. For each Part a progress window will come up showing you the progress of the export, and will close when the Part is done.

![]() To export your song as a MIDI .mid or Karaoke .kar:
To export your song as a MIDI .mid or Karaoke .kar:
| 1. | In the File menu, choose Export, then select "MIDI". |
For MIDI and Karaoke filetypes, Composer will present the Export MIDI File dialog box:
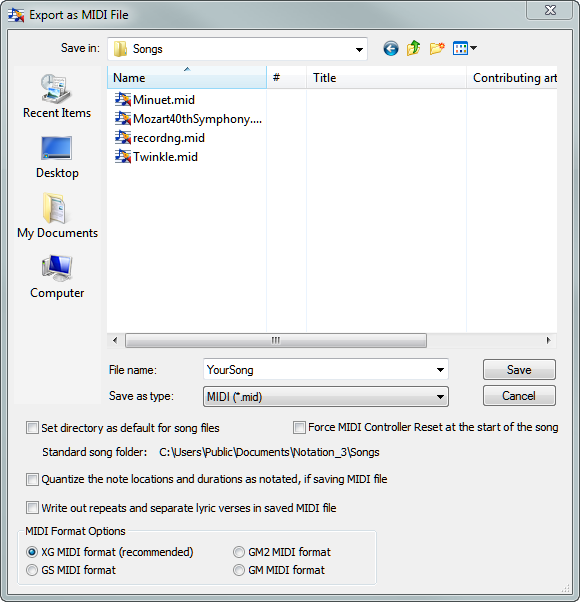
The default directory is C:\Users\Public\Documents\Notation_3\Songs. You can change the default directory, if desired, by navigating to another directory and then setting a check mark by "Set directory as default".
| 2. | Enter the name of the MIDI or Karaoke file you wish to export, and select either "MIDI (*.mid)" or "Karaoke (*.kar)" from the "Save as type:" drop list.. |
| 3. | If your keyboard or synthesizer needs to have the MIDI controllers cleared before a song begins playback, check the "Force MIDI Controller Reset at the start of the song" box. |
| 4. | Optionally set a check mark by "Quantize the note locations and durations as notated". |
Choose this option if you are using Composer as a tool for transcribing MIDI-to-notation, and wish to import the results into another music notation program. This will have the undesirable effect of making the MIDI performance sound very mechanical. However, this will adjust the notes so another music notation program can more successfully import and transcribe the MIDI performance. Said another way, Composer will do the hard work in transcribing the MIDI to notation, and the other music notation program can take advantage of Composer's MIDI-to-notation transcription. If the other program you are working with can import MusicXML files, then you might first try transferring the score from Composer to the other music program using MusicXML for better results.
| 5. | Optionally set a check mark by "Write out repeats and separate lyric verses." For example, if your song has repeat instructions to play four verses, and four lines of lyrics are included, then this option will expand the song into four written-out sections of the verse, each time with one of the four verses. Karaoke players will need this setting. |
| 6. | Select the MIDI file format that will best suit the device you will play your exported .mid file on. The XG format is recommended as it has the most capabilities and flexibility. However, some equipment can only handle other MIDI file formats, and so Composer offers the option of saving in the file format that you need. Please note that if a MIDI .mid file that you have opened in Composer is a particular MIDI format, then you cannot change the MIDI format to a different type on export. There are other software tools available elsewehere for making such format changes. |