Using the Piano Roll Palette


|
Using the Piano Roll Palette |
|
|
To edit the piano roll rectangles of notes rather than just view them, you need to use the Piano Roll Palette:
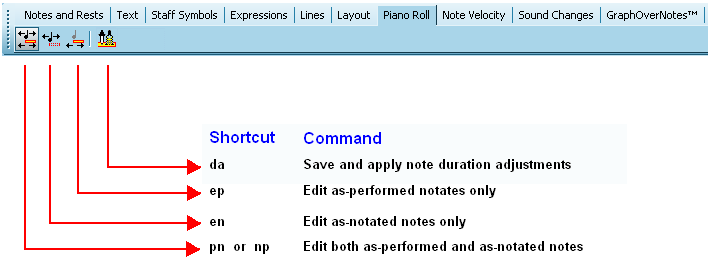
-- OR -- Type SHIFT + Y.
Composer enables you to independently edit the notation of notes and the as-performed timing of the notes.
-- OR -- Type "pn" or "np" for as-performed equals as-notated.
-- OR -- Type "en" for edit notation.
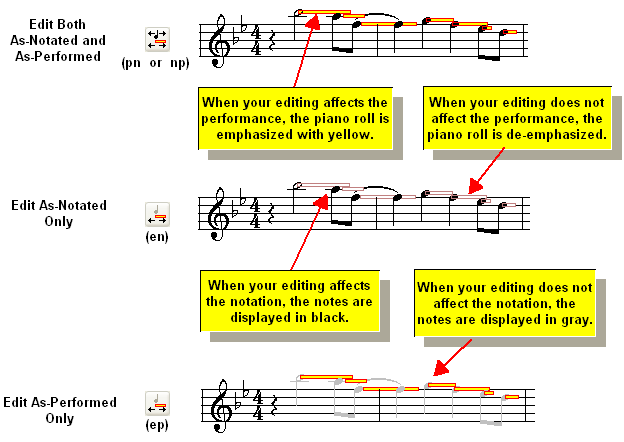
-- OR -- Type "ep" for edit performance. When you click one of the three Piano Roll Palette buttons to choose a combination of editing the notation and/or performance of notes, Composer will display the piano roll rectangles and notes differently, according to which option you choose:
Once you have chosen one of the options for Edit Both As-Notated and As-Performed, Edit As-Notated Only, or Edit As-Performed Only, then you can edit notes in the following ways:
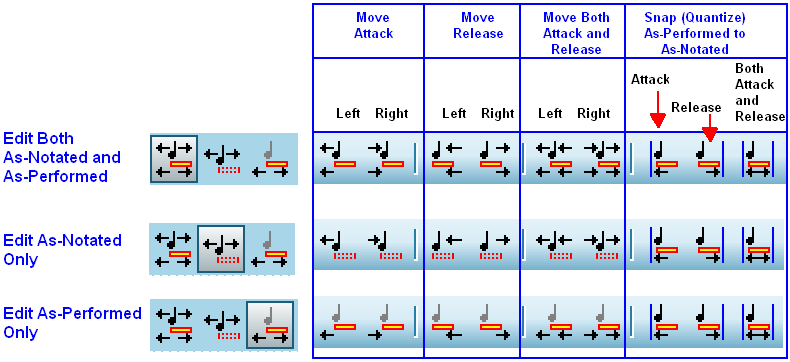
The following diagram shows what the Piano Roll Palette buttons look like, depending on which option you have chosen for Edit Both As-Notated and As-Performed, Edit As-Notated Only, or Edit As-Performed Only:
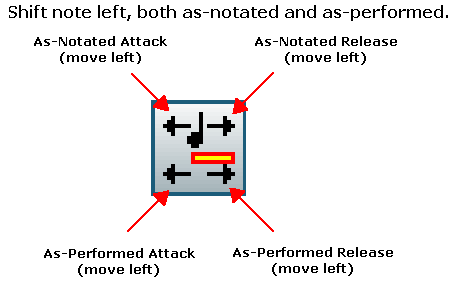
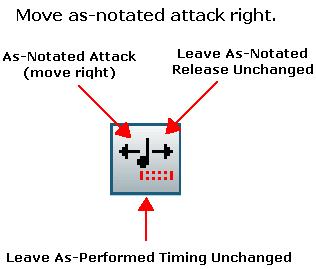
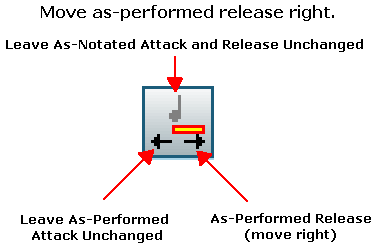
You can find out the purpose of each of the editing buttons in the palette by briefly holding the mouse over the button. Composer will display a short message explaining what that button does, and what the keyboard short-cut for the command is. You can also learn what the Piano Roll Notation buttons do by understanding the meanings of the small drawings on the button faces. The graphics on the piano roll palette buttons follow a consistent convention, which is summarized in the following diagram: For example, the above button has the following effect on the selected note: Each of the four corners of the button may or may not have an arrow that points to the left or right. The two arrows on the top half of the button indicate the effect of the button on the notation of the note. The two arrows on the bottom half of the button indicate the effect of the button on the as-performed timing of the note. The direction of the arrow indicates whether the attack or release of the note is to be moved to the left or the right. In the above example, the button shifts the entire note, both its notation and its as-performed timing, to the left. If the button only affects the notation of the note, and not its as-performed timing, then there are no arrows in the bottom half of the button face, and the piano roll icon in the button is displayed in a faded color. Also, the button may affect only the attack, not the release, in which case there is an arrow only on the left side of the button, not the right side. The following diagram illustrates these cases: For example, the above button has the following effect on the selected note: If the button only affects the as-performed timing of the note, and not the notation, then there are no arrows in the top half of the button face, and the quarter note icon in the button is displayed in a faded color. The button may affect only the release, not the attack, in which case there is an arrow only on the right side of the button, not the left. The following diagram illustrates these cases: For example, the above button has the following effect on the selected note when it is clicked several times: To see specific examples of how these buttons affect the notation and performance of notes, see Editing As-Performed Attack Location and Duration.
See Displaying As-Performed Attack and Release Offset Data for an explanation of the Save and Apply Duration Adjustments |


|