Tutorial: Viewing and Quantizing the Performance


|
Tutorial: Viewing and Quantizing the Performance |
|
|
In the previous step of the tutorial, you added some "polish" to the sheet music notation with annotations such as accent marks, dynamic marks, and slurs. In this final of the tutorial, you will add some polish to the playback performance of the song. In Composer , you can have an equally high level of control over both what the music looks like and what it sounds like. This step of the tutorial describes one way that you can edit the performance of a song that you have imported as a MIDI file, or recorded from your keyboard, or for which you have manually entered notes. Even if you do not intend to edit the performance of the song, you might find it entertaining and educational to view the performance of the notes with various features offered by Composer. This step of the tutorial describes how you can view the performed timing of notes. Composer also offers other ways that you can view and change the individual loudness of notes, pitch bend of notes, tempo changes, per-staff volume changes, and other aspects of the performance. For details, see Viewing and Editing the Music Performance. The MIDI file Twinkle.mid was originally prepared by recording live improvisations of keyboard accompaniments, using Composer's recording feature. Although about ten recording "takes" for different sections of the song were made to try out different ideas for the piano accompaniment, there has been no editing of the actual performed rhythms. The melody staff of Twinkle.mid uncannily has an appropriate child-like quality, due to the imprecision with which the melody was originally performed. For many styles of music, and perhaps thisTwinkle Twinkle Little Star song, it is desirable to preserve the original performed timing of the notes-- starting location (attack) and ending location (release). When initially editing notes of any song, Composer changes both the notation and the performance. You can, however, edit only the notation or only the performance if you desire. For some styles of music, it is indeed desirable to "clean up" the performance so that the performed timings of notes are exactly on the beat, that is, so that the timings of the notes are exactly as notated. This procedure of cleaning up the performance is typically called "quantization", especially in MIDI sequencing software and hardware. In Composer, the term "snap" is often used instead of "quantize". The performed attacks of notes can be "snapped" to the notated rhythms. And the performed durations of notes can be "snapped" to the notated durations. Quantizing a performance can have the undesired effect of draining the life out of a performance, so that it sounds too mechanical. You can avoid this by snapping only the attacks of notes but leaving the duration of the notes as originally performed. In a MIDI performance, the "articulation" of a note is mostly determined by (1) the loudness of that note and (2) its duration. If you leave the originally performed duration of the note unchanged, then the human feel-- the articulation-- of the note will be partly preserved, even when you snap the performed attack of the note to its notated location. In this step of theTwinkle Twinkle Little Star tutorial, we will follow the guideline suggested in the previous paragraph, in order to preserve most of the human feel of the performance. That is, we will quantize only the attack location of the notes, but leave the performed durations unchanged. Said more accurately, we will leave the performed release times of the notes unchanged. The first procedure shows you how to view the performed timing of notes, before you change the timings.
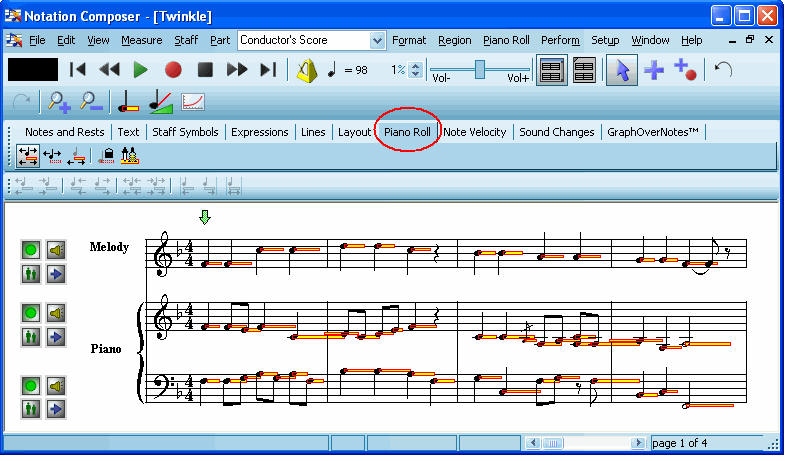
Composer displays the score as shown below. The rectangles drawn on top of the notes show the actual performed timing of the notes. These rectangles are called "Piano Roll Notation". This graphical representation resembles the hole cutouts for notes in piano rolls of mechanical player pianos that were popular in the late 1800's and early 1900's.
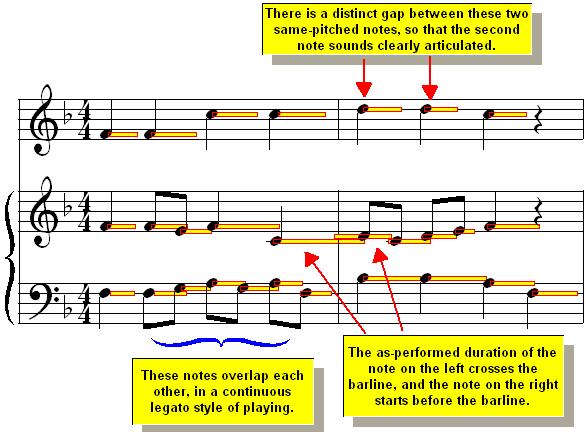
The left and right edges of a piano roll rectangle represent the actual performed timing of the note attack and release. The left edge of the rectangle divides the width of the notehead in half if the performed attack of the note is exactly at the notated rhythm. The right edge of the rectangle extends exactly to the middle of the next notehead if the performed release of the note is exactly at the notated location of the next note.
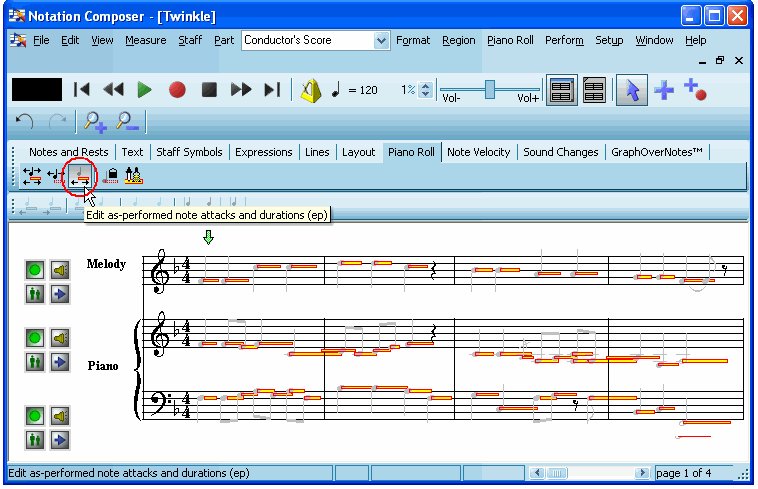
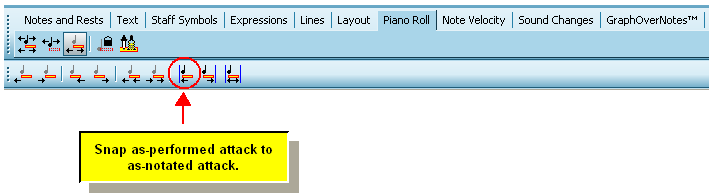
That instructs Composer that you intend to edit the as-performed rhythms of the notes without changing how they are notated in the sheet music. In response, Composer now displays the notes in a lighter gray color, to confirm that you will be editing just the performance (piano roll rectangles) of the notes, and not the sheet music notation of the notes.
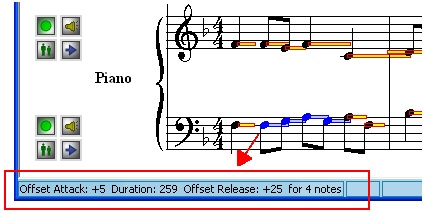
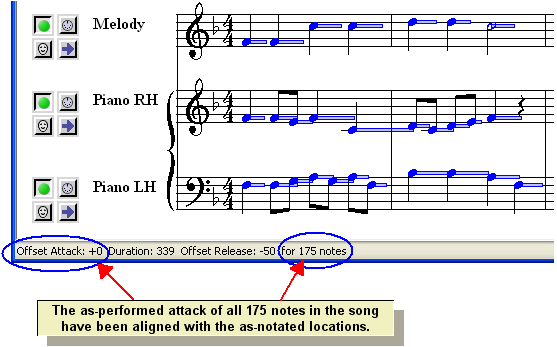
Composer will report the average offset of the as-performed timing of the note from the as-notated attack and release locations of the selected notes, as illustrated below:
The unit of measurement here is a tick. There are 480 ticks per quarter note (regardless of the tempo or meter of the song).
Before following these steps, first play the song, and listen to the timing of the notes. Especially, listen to the first note of the last measure in the melody. Remember, in an earlier step of this tutorial, that note was performed so late that Composer originally notated it as a sixteenth note past the beginning of measure. Even though we corrected the notation for that note, so that it starts at the beginning of the measure, the performance of the note was left unchanged. The note still sounds somewhat late.
There are several ways you can select notes, To select a few adjacent notes, just drag the mouse over them. To select all of the notes for the entire score, type CTRL+A, which is the standard Windows shortcut for Select All. Then choose the Convert Region to Notes command in the Region menu, or type "qcrn" for Quick Convert Region to Notes.
-- OR -- Type A+
Now play Twinkle Twinkle Little Star again. It is now played with a very precise rhythm, even though much of the expression of the song is preserved because the note releases were not quantized. We only quantized the note attacks in the above procedure. Listen again to the last measure of the melody. Notice how the first note in the last measure is now played exactly on the beat. It is no longer delayed as it was in the original performance.
You now have briefly explored how you can polish the sound of the song as well as the sheet music notation of the song. Congratulations! You now know the basic procedures to accomplish most common tasks in Composer. Now, explore Composer on your own to learn about the many more types of notation and performance editing you can do. And, of course, read other parts of this Composer documentation for a more structured exploration of Composer's features |


|