Specifying the Stem Direction (Voice)


|
Specifying the Stem Direction (Voice) |
|
|
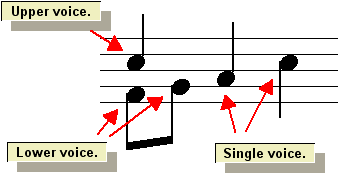
With Composer, the direction of a stem attached to a note is determined by the voice of the note. The term voice has musical meaning. The stem direction indicates the voice according to common music notation practice, as described below. If a part in the score is for a single instrument or human voice, which can only play or sing one note at a time, then all of the notes in that part are said to have a single voice. If the part is played or sung by two or more individuals, but they all play the same notes, and only one note at a time, then that part is also said to have a single voice. The stem directions for notes in a single voice may be upward or downward. If a note is above the middle staff line, the stem direction is downward; if the note is below the middle staff line, the stem direction is upward. If a part is for two players, and if the notes they play have different rhythms, then the part is said to be split with upper and lower voices. Upper voice notes always have upward stems; and lower voice notes always have downward stems. Piano and keyboard parts also indicate upper and lower voices to clarify and simplify the notation of notes simultaneously played with different rhythms. When all of the notes have the same rhythms, they typically use stem direction rules for single voice. These rules for keyboard voice notation are illustrated below: If a pair of notes-- one in the upper voice and one in the lower voice-- share the same pitch, then Composer will display the two notes using a single notehead with one upward stem for the upper voice and a second download stem for the lower voice. This will be done unless there would be ambiguity about the duration of the note in either voice. Two shared noteheads are illustrated below:
In Composer, you do not directly edit stem directions. Instead, you indirectly edit them by specifying the voice of notes. However, if Composer chooses a stem direction that is the opposite of what you want, you can force it in the opposite direction according to a procedure at the end of this topic.
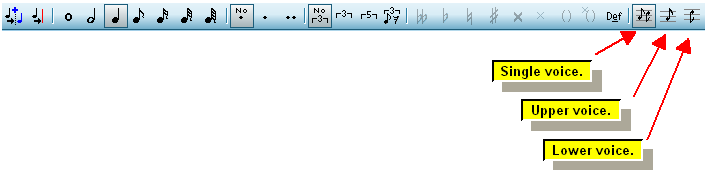
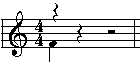
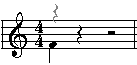
-- OR -- Type "sv", "uv" or "lv" for single, upper or lower voice. In Add Mode, as you move the mouse around, you will notice that the stem direction of the moving note is consistent with the voice you have chosen. For example, if you have chosen lower voice, then even if you move the mouse below the middle staff line, the stem direction of the moving note will remain downward:
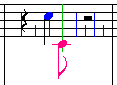
When you add a new note to a location in the score where another note has a different voice, Composer may change the voice of the other note in a way that should usually please you. In the following example, an eighth note is added one eighth note beat past the beginning of a quarter note that has a single voice:
When Composer adds the eighth note, it automatically reassigns the adjacent quarter from single voice to upper voice:
This works the other way, too. If you add a single voice note such that it overlaps some upper or lower voice notes already in the score, then Composer will automatically reassign those overlapping notes to a single voice.
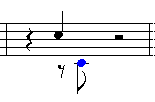
The score will then show a rest in the opposite voice, as illustrated here:
To select many rests, you may find it convenient to select a region using Ctrl+Drag, or by selecting an entire staff, and then use the Convert Region to Selection or Rests command in the Region menu.
-- OR -- Click the Hide Rest -- OR -- Type "h" for "hide rest". The rest will be temporarily reveal in gray rather than black:
-- OR -- Toggle of the Reveal Hidden Rests -- OR -- Type "r" to toggle off "reveal hidden rests". |


|